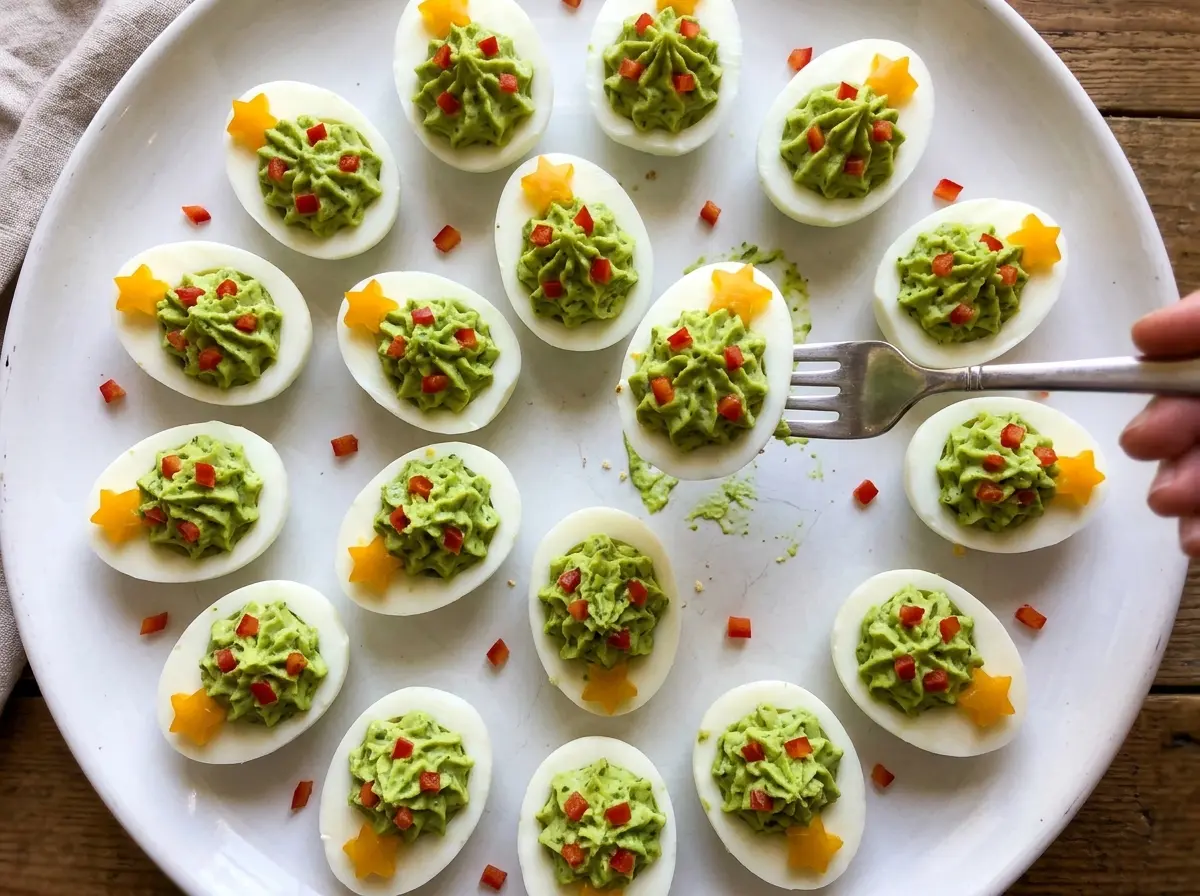
The shells come away cleanest when the eggs get a quick, cold stop after their time in the covered saucepan. Once they’re halved, the firm whites make tidy little platforms for the green trees, and Christmas Tree Deviled Eggs turn a familiar platter into something you can spot from across the table. I like how the red pepper reads as tiny ornaments against the green filling without making the eggs fussy to decorate.
The filling gets its color from green gel food coloring, which adds a strong shade without much extra liquid. Dijon and white vinegar keep the mashed yolks savory and bright, while a large open-star tip gives the piped trees ridges that hold the pepper pieces. The yellow pepper stars finish the tops; each one makes the tree shape easy to recognize. The result is creamy, tangy filling in a tender egg white, with a crisp little bite of pepper on top.
Kitchen Note
Press the red pepper pieces just into the piped ridges, rather than burying them in the filling. The filling is soft before chilling, and a light touch keeps each red ornament visible against the green.
Save these Christmas Tree Deviled Eggs for a holiday platter with green piped trees, red pepper ornaments, and little yellow stars.
Why the Ice Bath Matters Before You Peel These Eggs
The covered, off-heat rest cooks the eggs gently, but the heat held in the shells doesn’t disappear the moment you drain the saucepan. Moving the eggs straight into cold water with ice brings that cooking to a stop. That matters for the yolks: continued cooking can leave them dry and crumbly, and a gray-green ring can form where the yolk meets the white.
Cooling also makes the eggs easier to handle for peeling and cutting. The shells can still cling, especially if an egg is particularly fresh, so work patiently rather than pulling hard and tearing the white. A small chip in an egg white won’t ruin the platter, but smooth halves give the piped trees a neater base and keep the filling where it belongs.
Keep the eggs in the ice bath for the full cooling time before peeling. A properly cooled egg is firm enough to halve cleanly, and its yolk is easier to remove in one piece. That gives you a smooth filling and 24 intact white halves ready to decorate.
What Gives the Green Filling Its Color and Body

- Large eggs — Their size gives you a useful amount of white to fill and a yolk portion that mashes into a creamy base. Use eggs with uncracked shells; there’s no need for a specialty or premium carton for this presentation.
- Mayonnaise — This binds the yolks into a smooth, pipeable filling and gives it a soft, rich texture. A mayonnaise you enjoy on its own works well; a strongly flavored one can compete with the Dijon and vinegar.
- Dijon mustard and white vinegar — Dijon brings a mellow mustard bite, while vinegar sharpens the yolks so the filling doesn’t taste heavy. Keep both: they contribute different kinds of tang, and swapping one for the other changes the balance.
- Green gel food coloring — Gel gives the filling a vivid green color without adding much liquid. If you don’t have it, leave it out; the filling will stay creamy and taste the same, but it will be pale yellow rather than tree-green. Liquid coloring can loosen the mixture more easily.
- Red and yellow bell peppers — The red pepper adds small, crisp ornaments, and the yellow pepper makes bright stars for the tree tops. Choose firm peppers so the tiny pieces hold their shape; cut the red pepper finely and make the yellow stars small enough to sit on each piped point.
From Covered Saucepan to Finished Tree-Shaped Eggs
Let the Eggs Finish in the Covered Pan
Arrange the eggs in a single layer in a 6-quart saucepan and add cold water until it covers them by 1 inch. Bring the water to a boil over high heat, then cover the pan and turn off the heat. Let the eggs stand, covered, for 12 minutes; use a timer so the resting period stays consistent. Don’t keep the burner on during that rest, since the covered hot water is doing the cooking.
Cool, Peel, and Make Clean Halves
Drain the eggs and transfer them to a large bowl filled with cold water and 4 cups of ice. Leave them there for 10 minutes, then peel and halve each egg lengthwise. Keep the halves together as you work so you can match them into a full set of 24 white bases. Remove the yolks gently and put them in a bowl for mashing.
Mash Until the Filling Is Smooth
Add the mayonnaise, Dijon mustard, white vinegar, kosher salt, black pepper, and green gel food coloring to the yolks. Mash everything until no visible yolk lumps remain and the color is evenly distributed. A smooth mixture passes through the open-star tip more cleanly than a lumpy one. If streaks of green remain, keep mixing before transferring the filling to the piping bag.
Pipe the Trees and Add Their Decorations
Fit a piping bag with a large open-star tip and add the filling. Pipe a zigzag tree onto each egg-white half, starting with a wide base and narrowing toward the top. Press the finely diced red bell pepper into the filling as ornaments, then place one yellow bell pepper star on top of each tree. Refrigerate the finished eggs for at least 20 minutes before serving so the filling has time to chill.
Three Ways to Change the Look Without Changing the Filling
Keep the trees green, or leave out the coloring
Omit the green gel food coloring for a classic pale-yellow filling, then pipe and decorate the eggs the same way. You’ll lose the vivid tree color, but the yolk filling keeps its creamy texture and the red and yellow pepper still give each egg a festive finish.
Turn the red pepper into garland
Arrange the finely diced red pepper in short diagonal lines across each tree instead of scattering the pieces as individual ornaments. The filling and ingredient list stay the same, but the red reads more like garland and gives the platter a tidier, patterned look.
Pipe star-topped rosettes instead
For a different platter shape, pipe a compact rosette onto each egg-white half rather than widening a zigzag tree from base to tip. Keep the yellow pepper star on top and add the red pepper pieces around it. You’ll get ridged, bite-sized swirls instead of tree silhouettes.
Storage and Reheating
- Refrigerator: Store covered at 40°F or below and eat within 3 days. The whites soften a little over time, and the pepper decorations may release moisture.
- Freezer: Don’t freeze these eggs. The cooked whites turn rubbery after thawing, and the mayonnaise-based filling can separate.
- Reheating: These are served cold, so don’t reheat them; warmth softens the filling and egg whites. Don’t leave the platter at room temperature for more than 2 hours.
Questions That Come Up While Making Christmas Tree Deviled Eggs
Christmas Tree Deviled Eggs
Ingredients
Equipment
Method
- Place the eggs in a single layer in a 6-quart saucepan.
- Add cold water to cover the eggs by 1 inch.
- Bring the water to a boil over high heat.
- Cover the saucepan, turn off the heat, and let stand for 12 minutes.
- Drain the eggs and transfer them to a large bowl filled with cold water and the ice; cool for 10 minutes.
- Peel the eggs and halve them lengthwise.
- Remove the yolks and mash them with the mayonnaise, Dijon mustard, vinegar, salt, black pepper, and green gel food coloring until smooth.
- Transfer the filling to a piping bag fitted with a large open-star tip and pipe a zigzag tree shape onto each egg-white half, widening the base and narrowing the top.
- Press the red bell pepper into the filling as ornaments.
- Place a yellow bell pepper star on top of each tree.
- Refrigerate for at least 20 minutes before serving.