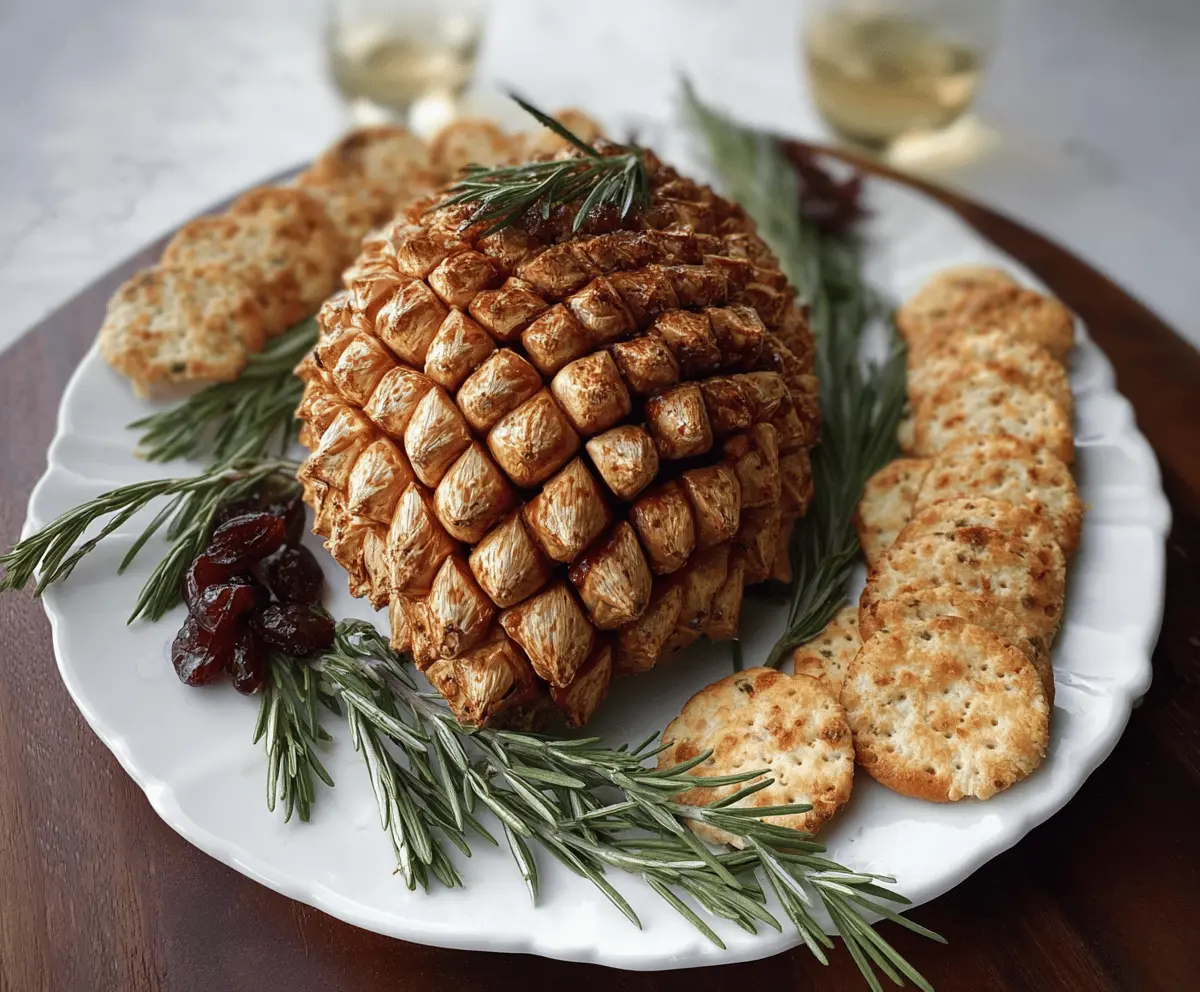
This fun Pine Cone Cheese Ball is a cheesy delight! Made with cream cheese, herbs, and nuts, it looks just like a pine cone, making it a perfect party snack.
You’ll love how easy it is to make, and everyone will be amazed by its cute shape. I like to serve it with crackers for a tasty combo that makes snacking a blast! 🧀✨
Key Ingredients & Substitutions
Cream Cheese: Softened cream cheese is crucial for a smooth texture. If you’re looking for a healthier option, you can use Greek yogurt or low-fat cream cheese, though it may change the flavor slightly.
Cheddar Cheese: Sharp cheddar gives a great flavor, but feel free to swap it with any other cheese you enjoy, like Gouda or Monterey Jack if you prefer milder cheese.
Nuts: Walnuts and pecans add crunch and flavor. If there are nut allergies, sunflower seeds or pumpkin seeds are good alternatives.
Spices: Garlic and onion powder enhance the overall taste. You could use fresh minced garlic and onion instead, but remember they will add moisture, so use them sparingly.
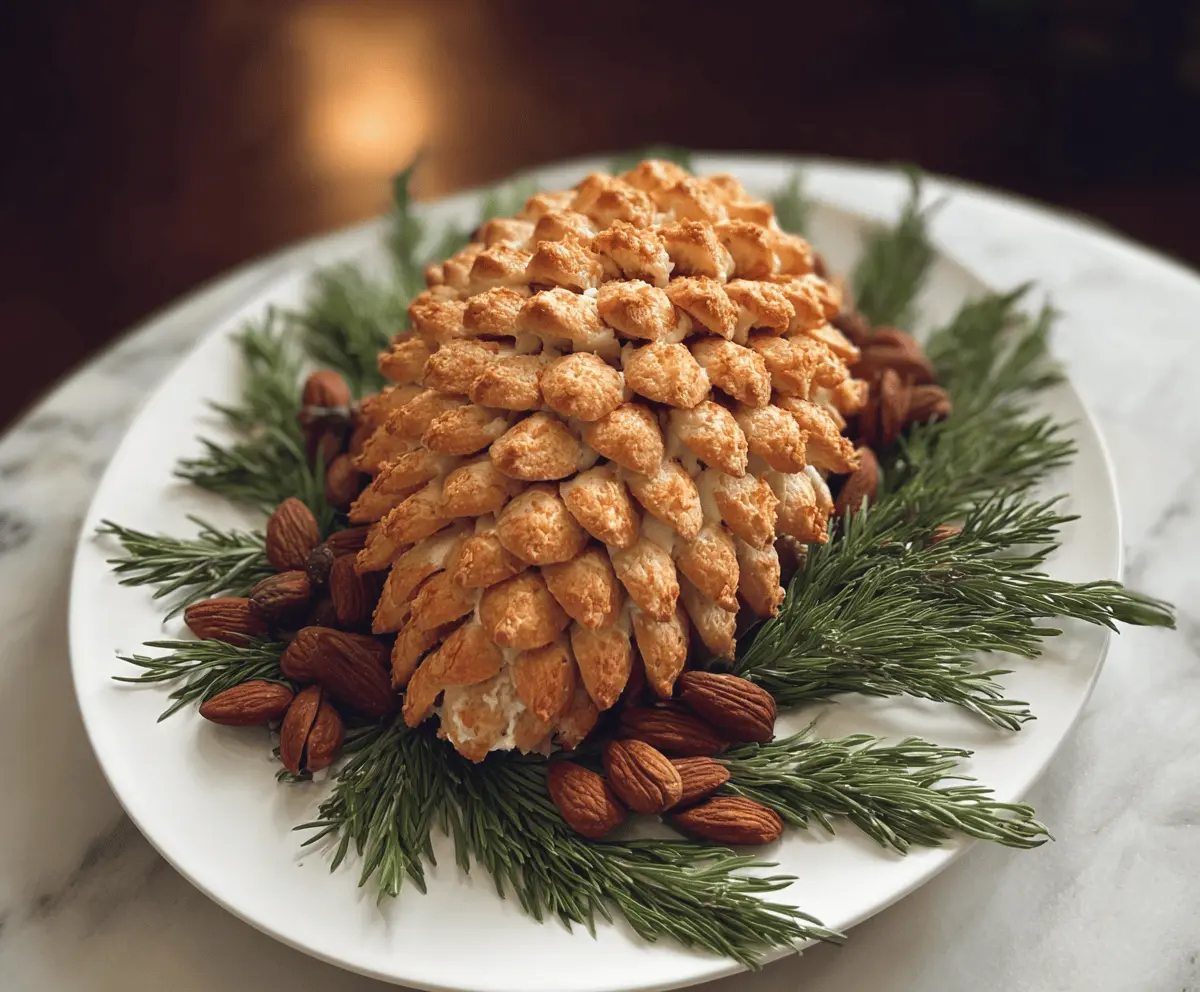
Almonds: These are for the pretty “pine cone scales.” Whole or sliced almonds work well. If you’re nuts-free, use sunflower seeds or even crispy rice cereal for a unique touch.
How Can I Shape the Cheese Ball Like a Pine Cone?
Shaping the cheese ball can be tricky, but here’s how to get that pine cone look right:
- Start by mixing all your cheese ingredients thoroughly until smooth.
- When shaping, think of it like forming a snowman: make a large bottom ball, then create a smaller top section. Make sure to taper it for the pointy top!
- Cover your hands lightly in water or oil; this helps mold the cheese without sticking.
- Use a plate to help you as you form the shape—it keeps everything intact and steady.
Be patient with the almond placement! It’s all about layering them in an overlapping pattern to mimic pine cone scales.
Pine Cone Cheese Ball
Ingredients You’ll Need:
- 8 oz (225g) cream cheese, softened
- 8 oz (225g) sharp cheddar cheese, shredded
- 1/2 cup finely chopped walnuts or pecans
- 1 teaspoon garlic powder
- 1 teaspoon onion powder
- 1/2 teaspoon smoked paprika (for color and smoky flavor)
- 1 tablespoon Worcestershire sauce
- Salt and black pepper to taste
- 1/2 cup almonds (sliced or whole, blanched for “pine cone scales”)
- Fresh rosemary sprigs (for garnish)
- Crackers (for serving)
- Dried cranberries or cherries (optional, for garnish)
How Much Time Will You Need?
This recipe takes about 20 minutes of prep time and is best chilled for at least 30 minutes before serving. You’ll spend a little time mixing and shaping the cheese ball, but it’s simple and so worth it for the tasty end result!
Step-by-Step Instructions:
1. Mix the Cheese Base:
In a large bowl, combine the softened cream cheese with the shredded cheddar cheese, chopped nuts, garlic powder, onion powder, smoked paprika, Worcestershire sauce, salt, and pepper. Use a spatula or a hand mixer to mix everything until it’s fully combined and smooth. This creates a delicious base for your cheese ball!
2. Shape the Cheese Ball:
Once your mixture is ready, pour it out onto a piece of plastic wrap. Shape it into a cone or ball that resembles a pine cone—don’t worry about it being perfectly shaped, as it can be a bit rustic! Wrap it tightly and place it in the fridge for at least 30 minutes to firm up.
3. Add the Pine Cone Look:
After chilling, take the cheese ball out of the fridge. Now it’s time to make it look like a pine cone! Starting from the bottom, press the almonds into the cheese ball one by one, overlapping them slightly as you go up. This mimics the scales of a pine cone. Once covered, sprinkle a little smoked paprika over the top for some extra color if you’d like!
4. Garnish and Serve:
Place the cheese ball on a serving platter and decorate around it with fresh rosemary sprigs to create the illusion of pine needles. You can also scatter some dried cranberries or cherries around it for color. Finally, arrange some crackers around the cheese ball for easy serving. Now your Pine Cone Cheese Ball is ready for all to enjoy!
This festive appetizer not only looks delightful, but it also tastes amazing and is sure to be a hit at any gathering!
Can I Use Different Types of Cheese?
Absolutely! While sharp cheddar and cream cheese are classic choices, you can substitute with other cheeses like Gouda, Monterey Jack, or even a creamy blue cheese for a unique flavor. Just make sure to keep a good balance of flavors and textures!
How Should I Store Leftover Cheese Ball?
Any leftovers can be wrapped tightly in plastic wrap or stored in an airtight container. Keep it in the refrigerator for up to 3 days. If you notice the almonds getting a bit soggy, simply reapply some fresh almonds before serving!
Can I Make This Cheese Ball in Advance?
Yes! You can prepare the cheese mixture and shape it into a ball up to 2 days in advance. Just store it well in the fridge. Be sure to add the almonds and garnishes right before serving to keep it looking fresh and appealing.
What Can I Serve With the Pine Cone Cheese Ball?
This cheese ball pairs beautifully with a variety of crackers, but you can also serve it with fresh vegetables like celery and bell peppers for a fun and healthier option. For an extra touch, offer some sliced baguette or pretzel crisps!